Wednesday, December 21, 2011

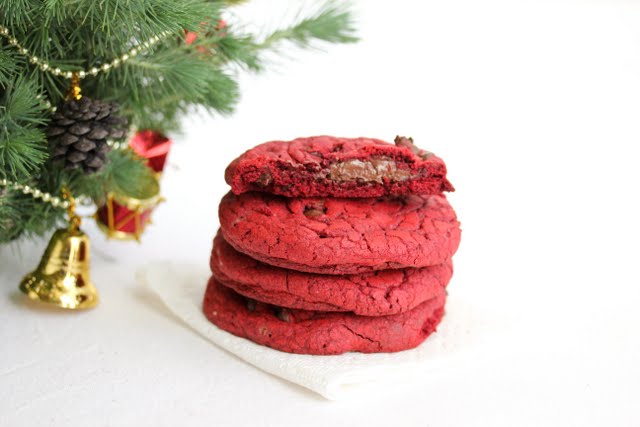
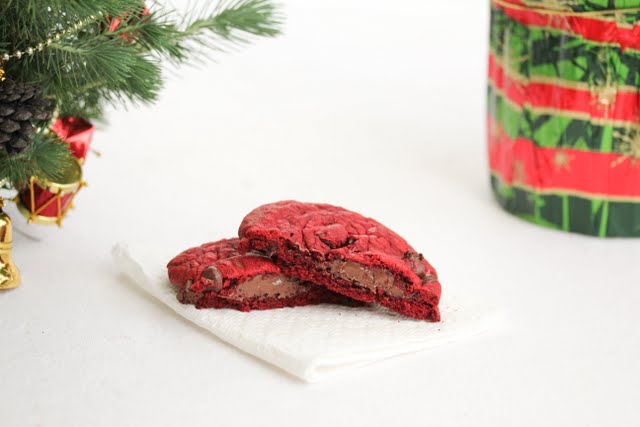
Nutella filled Red Velvet Cookies

Nutella filled Red Velvet Cookies and other Holiday Cookies


One box of Duncan Hines red velvet cake mix
2 eggs
Halfway between 1/3 and 1/2 cup of oil
1 cup chocolate chips
Nutella for filling

Directions:

1. Prep baking sheets with parchment paper and preheat oven to 350F. In a large bowl, mix the eggs, cake mix and oil. Once the batter is thoroughly combined, stir in the chocolate chips.
2. Take large spoonful of dough (about an ice cream scoop worth), flatten out. Place 1/2 tablespoon of Nutella in middle of cookie dough. Then pinch closed, form into ball and place on cookie sheet. Repeat with remaining cookies, spacing about 2 inches apart.
3. Bake for approximately 10 minutes. Cookies are finished when you can slide them, without the bottoms sticking to the baking sheet. Best served while warm.

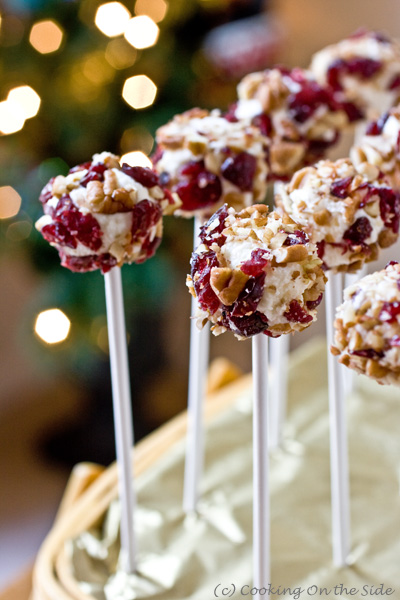
Cheese Ball Pops

Roasted Red Pepper and Basil Pesto Penne

Roasted Red Pepper and Basil Pesto Penne

If you're looking a quick and super tasty pasta dish, this is definitely one to try.  I made the pesto in the time it took to boil the noodles!  I'm a huge fan of the roasted red bell peppers that come in  the jar.  They are healthy, beautiful, super delicious and a very versatile pantry item.   For a side dish, the pasta is perfect.  To make this a main dish, I added some rotisserie chicken - an ingredient you just about can't beat to stretch a dollar. 

Ingredients

  • 4 cloves garlic
  • 1/3 cup pine nuts
  • 1/3 cup freshly grated Parmesan
  • 1 cup of jarred roasted red bell peppers, drained
  • 1 cup fresh basil leaves
  • salt and pepper
  • 1/3 cup extra virgin olive oil
  • 1 pound penne pasta
  • 1/2 cup heavy cream
  • roasted rotisserie chicken, optional

Directions 

I threw the garlic cloves in a small pan and added the cold olive oil.  I slowly pan roasted the garlic a while to mellow it out.  When you heat the garlic with the cold oil, the oil becomes flavored.

 Add the pine nuts to the warm oil and let them simmer just a minute or two.
 Add the garlic, pine nuts, and oil to the food processor and pulse until they are a fine paste.
 Add the Parmesan cheese and pulse.
Add the red pepper, basil leaves and salt and pepper.  Pulse to combine into a paste.  Set aside.

Cook pasta according to package directions. Drain and return to the pot. 
Add the pesto to the pasta and stir to combine. 
 Stir in heavy cream if desired for a creamier sauce. Heat until warmed through. 
 Stir in roasted rotisserie chicken if you want, or serve plain.
 Garnish with extra pine nuts, chopped basil, grated Parmesan.   Serve immediately.


* Make it a little soupier than you think you will need it.  The pasta will soak up a lot of the sauce.

Candy Cane Whipped Cream

Candy Cane Whipped Cream
4 standard size candy canes, unwrapped
1 cup heavy cream
1/2 cup powdered sugar
You will also need:
A piece of parchment paper, about 2 feet long
A mesh strainer
a large ziplock type bag
a candy cane pounder of some sort: rolling pin, frying pan, rubber mallet

Place your unwrapped candy canes in the zip lock bag. Place the zip lock bag on top of the parchment paper and smash the candy canes with your rolling pin until they have mostly turned to powder. 

Position your mesh strainer over your parchment paper. Pour the contents of your candy cane bag into the strainer.

Sift until the candy cane powder is on the paper and candy cane chunks are in the strainer. Save the chucks to add to your favorite cookie, chocolate cake or brownie recipe. 
form the paper into a funnel to pour the powder into a small cup. 
In the bowl of a stand mixer add your chilled heavy cream, powdered sugar and 2 tbs of the candy cane powder. You can add more powder for a more intense candy cane flavor or save the rest for another recipe. 
Whip on high until stiff peaks form. About 4 minutes. 

Paper Quilling

Quilling is one of the easiest crafts to learn and is a beautiful way to express your creativity with papers. If you’re new to quilling, we’ll show you everything that you need to begin. If you’re already a quiller and would love to join in the fun, stay on and you’re welcome to share your quilling tips with us.
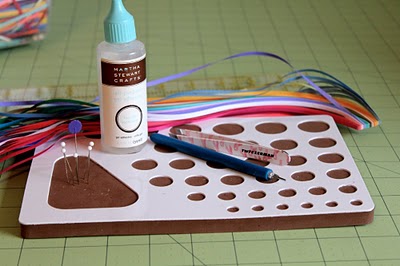
All you need are a few simple tools: Paper strips, a slotted quilling tool, small scissors, tweezer, and glue.
The quilling board is optional for this tutorial.
quilling-tools
Photo credit: Achieving Proverbs 31
If you plan to get a quilling kit, here are some options of starter kits from Amazon.
If you do not have a quilling tool yet but cant wait to get started with us now, you can opt to use wooden toothpicks or cocktail sticks.
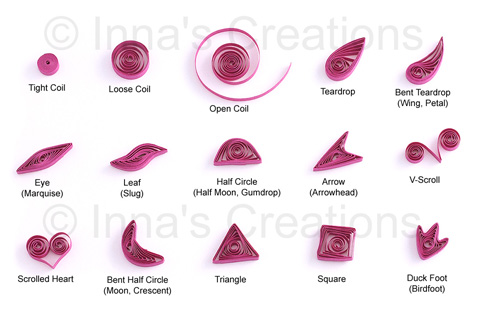
Normally, quilling is done with these  few variations of basic rolls and scrolls.
quilling basic shapes
Photo credit: Inna’s Creation
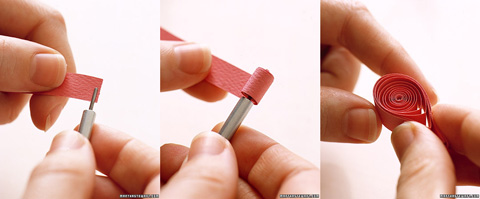
valentine quilling step by step
Photo credit: Martha Stewart
We’re recommending these two simple video tutorials to get you started on the Paper Quilling Basic Shapes.
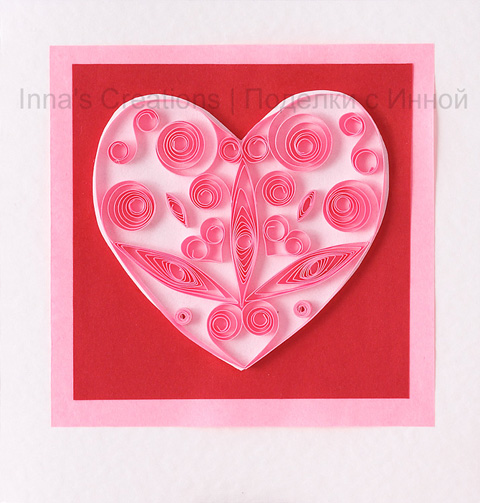
Once you’ve practiced enough and you’re comfortable to create something simple, try making one of these simple and beautiful Valentine cards as you first project!
valentine quilling heart
Photo credit: Elizabeth Moad
valentine quill heart

Ribbon Candy Ornaments

Ribbon Candy Ornaments

I remember trying to eat ribbon candy at Christmastime when I was a kid.  It was always a little too big for my mouth and didn’t really taste that great.  But I ate it anyway, because it was one of those things that was only available this time of the year, which made it special. 
As the years passed, I got over the need to actually eat the stuff, but I still think it’s pretty.  When my kids were small, we found kits to make ribbon candy ornaments from actual ribbon, thread and beads.  This is my take on those, using wire instead of thread.  I’m sure they taste just like the original.
ribbon 0
To make these you’ll need:  Ten inches of 20 gauge craft wire, ten 8-millimeter beads (give or take a few millimeters), and two pieces of 1 1/2” wide and 17 1/2” long grosgrain ribbon.  Grosgrain is the kind that isn’t shiny and has bumped-up rows on it. 
ribbon 1
Melt the ends of the ribbon carefully with a lighter so they won’t fray.  Using a fine-tip pen, make small dots, starting 3/4” from one end, then every 2”.
Using needle-nose pliers, make a hook using 1” from one end of the wire.  Thread on a bead.  Lay the two pieces of ribbon together, making sure the ends and edges are even, with the dots on top.  Stick the wire through both pieces at the first dot.
ribbon 2
If you have trouble pushing the wire through, you can use a large needle to make a pilot hole.  It also helps to cut the wire at an angle so it’s pointy.
Thread on another bead.  Push the wire through the next dot.
ribbon 3
Continue threading on beads and pushing the wire through the next dot as shown until you reach the last dot.
ribbon 4
Add one last bead to the bottom.  Push all the beads up to the top.  Bend the wire 1” below the bottom bead.
ribbon 5
Twist the remaining wire around a pencil to make a curl.
ribbon 6
Push the beads back down and you’re done.
ribbon 7
These are so easy and fun, I went a little crazy making them.  This set is in my boy’s favorite color:  camo, with a little Christmas thrown in.
ribbon 8
These would be cute gift toppers too. 
ribbon 9
And you still have a little time to make them!

Mini Chocolate Peppermint cupcakes

Mini Chocolate Peppermint Cupcakes
adapted from Cook’s Illustrated, May/June 2010
(makes about 34 mini cupcakes)
Ganache Filling:
3 tablespoons milk
1 1/2 tablespoons butter
1/3 cup dark chocolate chips, chopped
1 tablespoon confectioner’s sugar
Chocolate Cupcakes:
1/2 cup dark chocolate chips, chopped
1/3 cup cocoa (preferably dark, dutch-processed)
3/4 cup hot coffee
3/4 cup bread flour
3/4 cup granulated sugar
1/2 teaspoon salt
1/2 teaspoon baking soda
6 tablespoons olive oil
2 eggs
2 teaspoons white vinegar
1 teaspoon vanilla extract
1/4 teaspoon peppermint extract
Peppermint Frosting:
3/6 cup granulated sugar
3 egg whites
 pinch salt
18 tablespoons butter, softened (2 sticks plus 2 tablespoons)
1/2 teaspoon peppermint (add more to taste)
Oven Temperature: 350 F
Note: Parts of this recipe call for refrigeration. If you find that you’re at a certain step and can’t move on because something isn’t cool enough, just stick it in the freezer for a few minutes to speed up the process. Try not to let anything get too frozen, though (that happened to me with the ganache). Also, you can make these as 12 regularly sized cupcakes, but you’ll want to make about 2/3 of the frosting.
Begin with the cupcakes:
1.Line or grease 34 mini cupcake cups.
2. Add the chopped chocolate and cocoa to a medium bowl and pour the hot coffee over this mixture. Whisk the ingredients until smooth, and place the bowl into the refrigerator to cool completely (20-30 minutes).
Make the ganache filling:
1. Place the cold butter and milk  in a microwave-safe bowl and microwave for about 30 seconds. Your goal is to get the butter melted into the milk, so after microwaving, stir to make sure the two ingredients are combined.
2. Add the chopped chocolate and confectioner’s sugar to the bowl and whisk together. The mixture should be warm and the chocolate should melt. If you need to, stick the bowl in the microwave again to heat the mixture more. Whisk the ingredients together until smooth, and transfer to the refrigerator until just chilled, no longer than 3o minutes.
Continue with the cupcakes:
1. In a medium bowl, whisk together, the flour, sugar, salt, and baking soda. Set aside.
2. Remove the cooled coffee/chocolate mixture from the fridge and add the olive oil, eggs, vinegar, vanilla extract, and peppermint extract, whisking until smooth. Add the dry ingredients to this mixture and again, whisk until smooth.
3. Pour the batter into the prepared cupcake cups, filling about 3/4 of the way with batter. Add the chilled chocolate ganache by rounded teaspoons on top of the batter for each cup.
4. Bake the cupcakes in the preheated oven for 17-19 minutes. They should be rather firm to the touch when they are finished. Allow them to cool for at least 10 minutes before moving a wire rack to cool completely.
Make the frosting: 
1. Place a small saucepan filled halfway with water over the stove, and allow to heat until simmering. Meanwhile, add the sugar, egg whites, and salt to the bowl of a stand mixer (no need to mix). Place this bowl on top of the simmering water and whisk the mixture for about 2-4 minutes, until it is slightly thicker and foamy.
2. Remove the bowl from the heat and, using the stand mixer fitted with the whisk attachment, beat on highest speed until the mixture is the consistency of shaving cream and has cooled slightly, 1-3 minutes. Add the softened butter a tablespoon (or so) at a time, and continue beating until the frosting is smooth and creamy. Add in the peppermint extract and and beat, adding more extract to taste.
3. Frost the cupcakes once cooled.